Showing posts with label objects. Show all posts

Friday, 16 March 2012

Shuttlecock drop test V1

Poking around on myUCA, I found the reference videos that were very kindly posted up. My own set of shuttlecocks have actually arrived now, so I'll be able to shoot my own footage to use, but I thought it might be helpful to practice animating a basic drop of a shuttlecock before I get into throwing them around.


Analysing the video, I was able to break it down somewhat and figure out the main timings:


It's actually quite a tricky one to plot in thumbnails. I got a bit confused somewhere along the way - started out alright with the first graph by just showing a few of the poses and a few scribbled notes, but the second graph started to get a bit confusing where I started trying to get in more of the exact motion. I started by sketching it all in one place then halfway through started spacing it out (mostly cause I didn't have enough room on the left. Didn't occur to just sketch it going in the opposite direction) - it's fine for purposes of checking the poses but it doesn't make much sense in terms of what the shuttlecock is supposed to be doing. I should have refined it further and made a clearer, more final chart that makes sense to look at before trying to animate. Perhaps that's where I went wrong.

But anyway, looking at the video reference, the shuttlecock drops very quickly to start (weighed down by the tip), taking about 9 - 10 frames to fall. It hits the ground, tip-first and bounces back up again, slowly sagging to the side as it does. It doesn't bounce very high, and it pauses for a couple of frames but continues rotating slightly before it starts to fall. It lands on its side and the tip strikes the table/ground which causes it to bounce back up. The feathers of the shuttlecock hit the table as well which knocks the tip back forward - so you get a sort of wave effect as it rises and falls.

Bearing all this in mind, here's a first attempt:


This is mostly just a first draft, nowhere near complete yet - as always, little more than keyframes with no fcurve or timing alteration. That will all come once I've got the basis of the motion sorted out.


Just to review what I've got so far, the drop itself as the shuttlecock enters the screen is far too slow. It's only 10 frames, as per the diagram, but I don't think I really dropped it from high enough. If I increase its starting height then it should speed it up quite nicely.

It doesn't really bounce high enough after striking the ground, making it seem quite heavy. All I'll need to do is just increase the height of its peak and it should be a bit better.

The last problem is the bounce at the very end as it comes to a stop. I don't know if it's the timing, or some mistake in the keyframes, or even if it just looks weird because it's bouncing on the spot - but it seems to be a bit of a kink as it bounces off the table. I really can't put my finger on it - it's weird, when I step through it frame by frame, it actually looks fine, so I wonder if it's just in the spacing or timing?

After tweaking that, I plan to spread things out so that the shuttlecock bounces across the floor rather than up and down in a straight line - see if that helps things any - and then start looking at altering the curves and timing to give the shuttlecock a sense of weight. In accordance with the video I'd like to delay the shuttlecock at the peaks of each bounce for just a couple of frames and keep it rotating as it hangs in the air.


The process of animating the shuttlecock so far was pretty simple. Using the reference video posted on myUCA, I simply went through frame-by-frame, identifying key poses for the shuttlecock and simply replicating them within Softimage using the rig controls.


The shuttlecock rig is quite nice because it only has two controls - rotation and position - but I do find it very difficult only being able to view keyframes for one set of parameters at a time. This makes offsetting and re-timing things quite tricky as I need to keep flipping back and forth between each rig control to check the location of other keyframes.

I think the biggest mistakes I made in terms of workflow were not planning properly and also animating the shuttlecock bouncing in place rather than mimicking the motion in the video and having it go across the table. You'd think I'd have learned from the bouncing ball exercise that that's a bad idea!...

Nonetheless, I'll give it another shot!

Thursday, 16 February 2012

Slide homework V3, take 3

Made a brave attempt at altering some of the timings. Most notably the ball drops with significantly more weight than before - it certainly looks more like it's dropping rather than floating! I also attempted some timing adjustments on the exit from the slide, making it a little faster as it flies out the end and hits the table. I'm still not at all happy with the change in direction after hitting the ring - the physics feel totally off to me. I don't even have anything remotely ball-shaped to reference, and clips on Youtube are only so much help!

I've made some minor adjustments to the ball's bounces as it hits the floor as well, manually tweaking a few frames to give a slightly smoother arc. I've sped up each successive drop as well and brought the smaller bounces a little closer together to help give the idea that it's losing energy.


I can't quite seem to put my finger on why the recoil off the ring looks so off. It would certainly help if I had something to reference. I've got a slight feeling it might just be that the change in direction isn't quite sudden enough. It looks as if the ball hits the ring with a fair bit of speed, so it should probably fly off in the other direction a little more suddenly. Think I'm going to have to keep playing around with it.

I have actually added some rotation to the ball as well, but you can't see it owing to a lack of pattern or texture. I captured a version with the wireframe visible so you can actually see the rotation:


I actually prefer it without the rotation if I'm being honest - I think it's a bit distracting, but that might be because the rotation doesn't make any sense. I have absolutely no idea how colliding with the ring would effect (or is it affect?) the rotation of the ball, and as I said I've got nothing to reference. I went with my best guess and tried to just have it change direction to roll in the direction it's moving but that looks pretty clearly wrong to me.

I'd like to try adding a nicer rotation to the drop and bounce, as well as have it slightly teeter over the edge of the table just before it drops. I think in order for that to work I'd need to have a gradual deceleration after it hits the ring, so it approaches the edge a little more slowly.

But hey, it seems to be shaping up at least! 

Wednesday, 15 February 2012

Slide homework V3

Here's a little progress on my third attempt at the slide task. It's not yet complete but I figured I'd take a breather and just talk a bit about what I've come up with so far and how the approach I've taken has been working out. These sort of half-finished progression posts are quite helpful I find!

So, this time I sat down and thought about it much more carefully, spending some time plotting out the path and action that my ball would take. I ran through the sequence at different speeds in my head and on paper, timing myself using a stopwatch and taking a very loose average of the timing that worked best. I plotted the rough keyframes on this sophisticated and totally accurate diagram: 

Using the chart as reference I was able to copy the keyframes over to the 3D counterpart, which really helped me to get to grips with the timing. I also took a brave stab at timing/spacing charts which you can see dotted all over the page - though certainly far from an industry standard I feel that taking the time to have a go at them myself really improved my understanding of how they worked. I've read lots about thinking in rhythms and spacing and beats but I just didn't really understand how to apply any of it. I think it's one of those things that, no matter how many books you read on the subject, you actually have to give it a go before the penny finally drops. 

I hope that made sense.

Anyway, though the resulting animation probably doesn't look too much different, the process and workflow of actually creating it was more logical and far more straightforward. A little forward planning really does make such a monumental difference - and a far less stressful experience.


It's not quite complete yet, as you can see. I still need to tweak a little of the timing as the ball exits the slide - I kind of feel that its entry to the table is a little too slow. I think it could stand to be a bit faster so that the impact with the ring causing it to roll off the table makes more sense.

Aside from that, I had a crack at giving the balls a little more weight and personality by squashing the red one as it pulls back and stretching it as it lunges forward, to give it a bit of strength. I think the impact of the peg with the blue ball has a little more kick as a result! I'm relatively satisfied with the path of the ball down the slide itself, aside from the aforementioned speed issue.

The next major thing is to get the ball to roll off the table and look at giving it a bit of bounce as it rolls away. Then I can go back and start manually tweaking the inbetweens to create breakdowns and ensure that the path of the ball is as natural as possible.

Tuesday, 14 February 2012

Slide homework V2

Second attempt at the ball and slide task, this time reverting back to good old fashioned keyframe animation!


This isn't entirely finished; the drop of the ball is totally off and I'd originally wanted to have it bounce away as it hit the ground. I've sort of hit a brick wall with it, though, for reasons I'll get to in a moment.

I think it started out rather well - though a little quick on exiting the slide, I think the timing going down and shooting off at speed was heading along the right lines. However, I began to get really confused once the ball was on the table. I found that, where I'd not really considered my timing too much in advance, I was kind of working on the fly - which can sometimes work very nicely - but in an unfamiliar software environment it can be pretty detrimental as you're not really learning anything about the tools or how they can be applied. You're not entirely sure what you're aiming to create, so it's hard to see how the tools can be applied to achieve the desired effect.

I think I was skipping a lot of fundamental stages, creating too many keyframes (which should have acted as breakdowns) before I'd even set down the main keyframes, so the predictive/automatic inbetweens were going crazy and causing me to get very confused with my timings! Without laying down the basic timing it's very hard to get convincing animation in any case. You'd think I would have learned this by now!

I think that a lot of it is due to the unfamiliar environment. As I said in a previous post, 3D seems like such a radical departure that it's easy to forget that the same basic principles apply. "Keyframe" seems to mean something completely different when applied to digital animation, and I think that screwing up on this attempt has helped me to re-evaluate how I'm using the software. I've somehow convinced myself that 3D/digital animation requires a whole new skill set, which is of course completely untrue. It should simply be an extension of the pre-existing skills; applying what I already know to a different architecture.

I can now completely appreciate what Jon meant when he talked about the importance of planning in digital animation. That isn't to say that I've been totally thoughtless about these tasks - I've certainly been considering timing, but I think I'm too impatient, too anxious and too keen to get to the final result and prove to myself that I can do it. I imagine that's fairly common?

Anyway, going back to the animation itself; it doesn't look too bad now that I look at it - I think the basics were there - but by the time I'd gotten the ball onto the table I was so confused  by the mass of keyframes staring back at me that trying to fix it seemed an impossibly daunting task.

I'm going to go back a bit and try really thinking about this - timing it properly, considering exactly what I want the ball to do and laying out the keyframes on paper first - just like I would (or should) do with any conventional animation. It will then be much easier to pinpoint where my breakdowns need to go and which frames need tweaking by hand. I might even try my hand at one of those impossibly scary animation charts... doesn't matter how much I read about them, I still seem to be frightened off by the prospect of numbers! 

Slide homework V1

I'll be honest; I had absolutely no idea how to even begin approaching this one! I think I was so wrapped up in wanting to make something impressive and amazing and perfect that I just flailed around, trying to think of the cleverest, easiest way to animate the ball. I also thought it might be a nice idea to practice with some of Softimage's other animation tools... probably a mistake, considering I'm still not all that proficient or confident with keyframes! 

In this first example, I tried using the Create Curve tool to draw a path for the ball to follow:


Underneath the Create > Curve section of the Animate mode, there are a series of options that allow you to create curves or paths in different ways. I chose "Draw Cubic by Knot Points"... mostly because that's the only one I could find a tutorial for.


It works in a similar, albeit slightly more baroque, manner to Photoshop's pen tool. It's a little different; the pen tool allows you to adjust the curve/handles of the path after making two connecting points, but Softimage only allows you to manipulate the curve after placing the third - and the curve is set automatically depending on the position of the knot points. Here, for example, the depth/angle of the curve is drawn from the first and third points in the direction of the second. It's almost like the second point is a magnetic field and pulls the curve towards it, outwards from the knot at either end. That's a horrible analogy but it's the best way I can think to describe it, because it's really weird when you first use it!


The knots can be manipulated with the translate tool; use the 'Point Selection' mode (shortcut: T) to select the desired knot and then the translate tool to manipulate the curve.


Once I'd figured out roughly how the tool worked, I was able to trace a rough path of the ball's intended route down the slide and across the table:


First big mistake was not really planning how I wanted it to move; I just kind of went with the general flow of how I thought it might naturally progress down the table. I didn't think it too likely that the ball would travel through all of the rings on its course, so I had it bypass a few.

To attach the ball to the path, I selected the ball and used the 'Set Path' property found under the 'Path' section of the 'Create' menu. This locks the object to the beginning of the path and animates it along the curve drawn using the cubic knot tool... thingy. (That's the technical term!)


This will bring you into 'pick' mode; simply click on the path you want to lock the object to, and the object will then snap to the first knot on the curve.

The resulting animation is, unfortunately, a rather lifeless movement along the path. The movement is slow and unchanging with no life to it whatsoever; try as I might, I simply could not figure out how to alter the speed of the object. No keyframes appear to have been created, nothing in the animation editor, and I wasn't able to dig anything up on Google. I would imagine that figuring out how to alter the timing (if at all possible) could potentially yield some very nice results and make path animation a great utility, but at this point it doesn't seem worth worrying too much about. Animating with keys gives you much more control over the animation in a much more straightforward manner. I think I just got a bit ahead of myself! Still, experimentation is usually a good thing, right?

Croquet animation V2

Just realised I forgot to post my re-done croquet shots! Whoopsie!


I made some very minor tweaks to the croquet animation, probably not terribly noticeable with Blogger's horrible video compression! I altered the timing as the mallet swings back so it's a little faster and added a minor delay, just before it swings down. The downward swing could certainly use a little speeding up; seems a bit slow, considering the speed of the backwards swing. I tried to add a very slight overlap to the mallet after it finishes its swing; it drops back very slightly before coming to a rest. It's only minor and I think that if the swing was a little faster and the overlap a little more exaggerated, it would probably feel a bit looser and more lively.

I think the ball, despite my best efforts to create a slow in/deceleration, comes to too much of a sudden stop at the end. I've been finding Softimage's "predictive" inbetweens a little confusing to get to grips with, though I can't pinpoint why; I suppose it's best to go back and manually tweak them by hand in order to iron out the bugs, much like in After Effects, though it's not such a problem here with such basic animation. In the shot below you can see a large clump of keyframes; my attempt to "slow in" the ball to the ending pose.


I think I'm gradually getting to grips with the dope sheet. It certainly is more intuitive than the regular timeline... and it's not quite so headachey as the animation editor (which I know I'm going to have to conquer sooner or later!)

You might notice the weird red and blue afterimages following the ball in the screenshot above; that's the animation ghosting, Softimage's answer to onion skinning. It took me a while to figure out how to enable it!


Basically, you need to select the object(s) that you'd like to onion skin - in this case, the blue ball - and manually enable the ghosting feature. Open up the property page for the object (shortcut: Alt + Enter) Within the visibility tab there's a small button that says "Ghosting" - if this is checked on and ghosting is enabled within the viewport, you'll get a lovely wireframe trail showing you the position of the object on all the previous frames.

The option to enable ghosting within the viewport can be found in the same place as the headlight or object view options:


Simply check on the "Animation Ghosting" option and hey presto:


Lovely onion skinning! It's already proving infinitely useful in figuring out things like timing and just generally planning the animation. I'm hoping that, with a bit more practice, I'll begin to gain a better understanding of how things like timing and weight can better be achieved in Softimage. It's easy to forget that, even though the environment has changed, the basic principles remain the same. I'll probably go back and do some more tweaking to this a little later on now that I can better see what's wrong with it.

Friday, 10 February 2012

Lesson 02 — Explorer, Keyframes & Dope Sheet

Great lesson, learned a whole bunch (despite blog-related embarrassment...!) — the dope sheet I found particularly useful. I'd not previously been aware of it at all and it certainly answered many of the frustrations I'd encountered in my previous attempts at keyframing.

Initially, we were introduced to the basic animation interface and default timeline. We were shown how to set up the camera/output preferences - I'd been having great frustration with previous exports where all my stuff came out skewed no matter what I did so it was a relief to find out what I'd been doing wrong!

File -> Preferences -> Output Format

There are a number of preset output formats - however, these will be optimized for TV display, i.e. NOT square pixels. Best to use a custom preset! 

Ensure 'Maintain Picture Ratio' is UNCHECKED.
Pixel ratio: 1
Resolution: 1024 x 576 (widescreen)

Remember to double-check frame settings - should be working at 25fps. 

Hit 'Apply settings' to... well, apply the settings!

After setting up, we started by animating a simple object using basic keyframes on the default timeline. No fancy timing adjustments or dope sheet witchcraft here.


I, rather uncreatively, picked a sphere. And made it fly uncreatively across the screen. Hey, this was a technical exercise! Achieved simply by keyframing the scale and position values of a primitive sphere object.

We were then introduced to the dope sheet which allows for much more refined animation by providing greater control over keyframes. The dope sheet can be accessed by View -> General -> Dope Sheet, or alternatively by opening the Animation Editor (shortcut 0) and then clicking Editor -> Dope Sheet.


The dope sheet is, effectively, an expanded version of Softimage's default timeline. It displays all keyframes for all parameters of the selected object all at once - far more intuitive than the regular timeline, which simply displays all keyframes on one row which can cause a lot of really unnecessary confusion.


You can select and move all keyframes for all parameters by clicking the giant green square in the topmost row - very useful for making quick timing adjustments! Alternatively, you can select one or more keyframes for specific parameters simply by clicking the corresponding coloured square for each parameter. (Hold CTRL + click to select multiple keyframes)

We were provided with a premade scene file with a croquet mallet and ball. Using the dope sheet, we basically had to use the mallet to knock the ball from A to B, using the dope sheet to adjust timings where appropriate. 


Only really had 15 minutes to do this, so it's pretty unpolished at this stage and the timing's really squiffy. I tried to delay the hammer slightly before it comes swinging down to give it a little more character, though it still needs work. I'm thinking I may hold it at the furthest position for a little bit to add some anticipation. The ball is very static too - there's no feeling of contact or weight when the mallet strikes the ball and it moves very uniformly. I'm going to try and alter the timing so the ball decelerates before coming to a stop. I'm not entirely sure how to improve the impression of power when the mallet connects with the ball; I'm going to simply need to experiment with it a little bit. Maybe if the hammer swings a little faster it would help?

I've also gone over Jon's awesome exporting tutorial which, again, solves a lot of problems I'd previously encountered with exporting, so expect a post on that soon! 

Saturday, 4 February 2012

Lesson 01 — Introduction/Softimage overview

Really looking forward to the next Digital Skills unit — the amount of work is vaguely terrifying (how are all those files going to fit onto one data disc?!) but it's looking to be a good one. I've never thought that 3D was really my thing but I wonder how much of that has had to do with lack of proper tuition — now that we're actually covering it properly I can see myself quite easily growing to love it.

Today's lesson provided a pretty basic overview of the software and some of the ___ navigation and transformation tools. I'm really glad I played with the program beforehand; I don't think I would have remembered everything otherwise! Softimage is such an expansive piece of software — seeing the interface for the very first time sent me screaming into a corner…

I've previously covered the interface during my own exploration of the program so I won't repeat myself here, but just to recap in summary:
  • Main Softimage display is split into four 'viewports' which can be customized, expanded or switched with different views to best suit your workflow. By default, these are set to User/camera, a top, front and right view. 
  • You can dock any menu or panel within the four viewports for easy access.
  • 'User' viewport setting can be used to move around the environment without moving the physical camera. Very useful for checking/adjusting its position or making adjustments without botching it up!
  • Use the 'Headlight' option (found under the small menu in the top right of any viewport window) to illuminate your model from all angles.
  • The Explorer panel shows all detail about everything within your scene — similar to the layers panel in Photoshop. There are a few different explorers available: the Scene Explorer displays a list of all cameras, lights, geometry, objects etc. You can view a hierarchy of any materials or textures applied to a specific object.
  • The Selection Explorer is identical to the Scene Explorer except that it only displays information for the currently selected object.
  • Shortcuts for main transform tools are X for scale, C for rotate, V for translate. Press or hold space bar to flip to object selection mode. S is for navigation tools, allowing you to pan in and out of (middle mouse button/scroll wheel), orbit around (right mouse button) or track across (left mouse button) the scene.
  • Small panel at bottom of Softimage window will remind you of the mouse functions/shortcuts for currently selected tool.
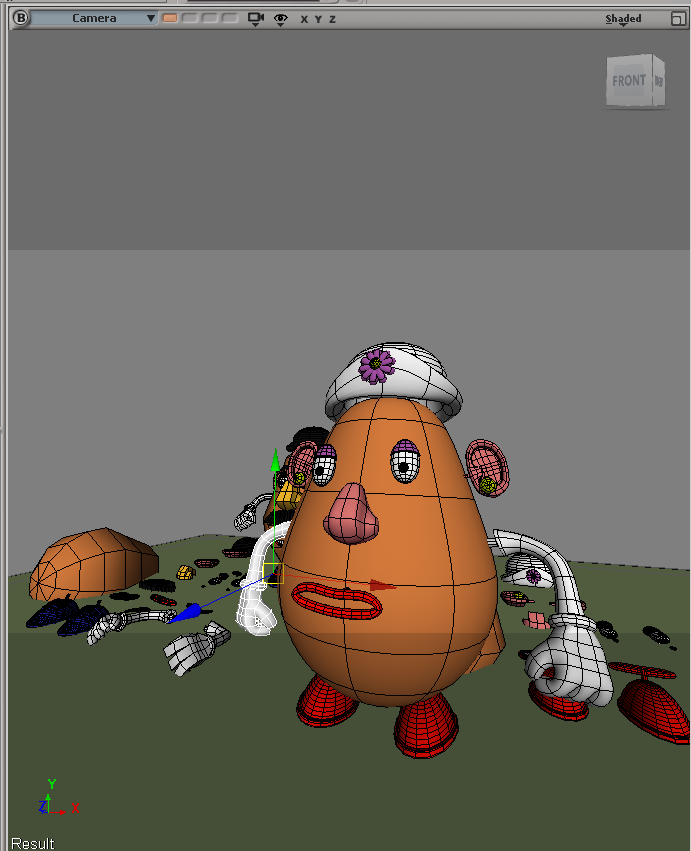
We were set a basic task to assemble Mr. and Mrs. Potatohead using the tools we'd been shown and produce a simple 4-panel comic strip using the posed figures.

(I'd just like to point out that for the majority of these screenshots I seem to be in Render mode — I'd been playing about with materials earlier today and forgot to switch it back! I didn't even notice, though, and was able to continue working without any difficulty/referring back to the menus, so I guess that's something of a sign that I'm getting better with the program...?)


My initial attempts to construct Mr Potatohead were clunky and awkward — I kept clicking the wrong buttons and forgetting which axis was which, but as I spent more time moving around the workspace I found myself adapting very quickly to the keyboard shortcuts and interface. By the time it came to Mrs. P I can say, with some measured confidence, that I was working fairly fluently within the program. I didn't struggle so much to 'read' the viewports and lining objects up became much easier.

I found that expanding the 'user' viewport on the right hand side to be most useful, leaving the other two for front and top views. This gave me the freedom of navigating within a fully 3D workspace, allowing me to freely pan and orbit around the scene and place objects pretty much however I liked. I was then able to use the other viewports to ensure everything was lined up correctly. The 2D top/front viewports are ideal for precise position, scale or rotation tweaking.


The only trouble with screenshots is that I only tend to remember to take them after I've finished doing something, which makes it look as if I work quite statically. The screenshots above would imply that I was working without moving the camera very much at all — rest assured that the big viewport was being swung around wildly, inspecting every orifice of my big plastic potato from all conceivable angles to ensure everything was plugged together properly! (I've seen enough side-views of his nose to last me a lifetime)
The caps of the eyeballs/eyelids were surprisingly tricky — once the eyeballs had been rotated into position the eyelids had to be very precisely fitted into position. If they were off in any way, the eyeball would protrude through and look a bit strange.
I made full use of all three viewports in this situation — the top and front were used to drop the eyelid into position and roughly line up the rotation, with the main 'camera' port used to fine-tune and ensure the eyelids were slotted over the eyeball correctly with no awkward protrusions. I found that choosing to display the wireframe over the shaded model (activated from the same menu as the headlight option) was amazingly useful at this point. I was able to see, at a glance, whether the meshes were aligned correctly and that the angles of the eyelids and the eyeball were matching up.

After completing the basic construction of the figures, I then had to remap my laptop keyboard to allow me to increase the mesh's subdivisions — that's tech-talk for "make it pretty!"

Once the model has been smoothed out you can really see the difference. The size and position of the pieces will have changed slightly, so I spent a little bit of time tweaking the position of the limbs to make sure everything was in place again.
(this is terrifying and I apologise)

With my models put together and smoothed out, it's now time to pose them and start on that comic!

Softimage XSI: Bouncing ball test

I've discovered that Softimage has some absolutely incredible preset simulators/parameters that can give you some really nice results very quickly. Using the "soft body" and "gravity" simulators, I was able to create a very simple ball bounce almost entirely automatically; complete with a very nice squash and stretch effect. They work a little like After Effects' animation presets I suppose, with a whole plethora of parameters you can customise to get the desired effect.


Obviously it's far from perfect; it's far too slow, subsequently lacking any real feeling of weight, but it just goes to show how quickly you can get a very nice result with this program. It's no replacement for hand-crafted animation of course, but it's a real time saver and certainly worth knowing what all these options do!

I may go back and tweak the settings to see if I can adjust the speed of the drop and the impact with the surface.

Friday, 3 February 2012

Softimage XSI: Keyframe animation tests

I've sort of got the hang of the very basics of Softimage at this point (still getting used to shortcuts and whatnot) so I've started experimenting a bit with the actual animation capabilities. Nothing complex so far; I've had a go with keyframe animation in an attempt to figure out how it works. 

I did have screenshots of all the following exercises, but unfortunately some unforeseen technical problems forced me to re-install the Windows partition. I was a bit stupid and backed up my actual project files but forgot the screenshots... hey ho, lesson learned. I'll do my best to gabble my way through this and then re-take some shots later today!


The first attempt was the most straightforward piece of keyframing I could muster; sliding a ball across the floor. Mostly just trying to figure out how things actually work here before I start getting too fancy! 

Once I'd learned where all the buttons were, I tried messing around with timing and spacing a little bit.


I attempted to inject some sort of character into the ball — I was aiming to have it speed in and then slow to a stop, but Softimage has a slightly convoluted way of working with keyframes and I'm not quite used to it. I couldn't figure out how to move keyframes on the timeline, or delete them properly, so I was pretty much stuck with what I botched out first time. It's alright — it works, but the timing and speed is very off. There doesn't seem to be any onion skinning or anything so it's quite difficult to map out the spacing correctly — this was mostly guesswork!

After the second attempt I did a little more reading into how keyframes work to try and get a better understanding before I tried anything again. I managed to figure out how to edit and delete them at long last, so the third attempt was marginally more successful:


I'm not entirely sure why the ball is moving away from the camera, as I was positive that I'd animated it in a straight line as with the others — perhaps I messed something up with the camera settings or export. It could also be that I used the animation editor to tweak this one rather than standard keyframing — it's hard to describe without screenshots, but it's basically a big curve graph that displays keyframes on the parameters of an object (the position or scale, say) that allows you to very quickly see where the "rough" spots are and smooth it out — quite literally. Dragging the keyframes up or down on the graph alters the curve and adjusts the parameters so you can pretty quickly get a feel for the timing and how it's going to run before you even hit the play button.

I can see it being a really intuitive and useful way of animating but it takes some getting used to! As we see here the ball is perhaps too quick and there's not quite enough of a slow down at the end, but it's a start!

Sunday, 29 January 2012

Softimage XSI: Selecting and transforming objects

Now that I've got a basic overview of the interface, I'm getting my hands dirty with actually moving and manipulating objects. Wish me luck...


Here I've got two "primitive" objects, a sphere and a cylinder. Currently the cylinder is selected. The panel on the right hand side is my transformation panel and contains all the tools I need to scale, rotate or translate (move) my object around the workspace. Currently, scale is selected.


Objects can be scaled by simply grabbing the handle and dragging it up or down to transform the object along that axis.

Objects can be transformed across all three axis simultaneously by clicking and dragging in the center of all the axis. This constrains the proportions of the object across all axis - similar to scaling whilst holding shift in Photoshop.


You can also transform objects on just two of the axis by holding the cursor between the two handles that you want, then clicking and dragging in the normal way. I got far more excited about this than I perhaps should.

The space bar functions as the select tool in Softimage. Hold shift to select a new object - otherwise you'll continue to transform the previously selected object!

Keyboard shortcuts

Scale - X
Rotate - C
Translate -V
Select - Space bar