Showing posts with label shortcuts. Show all posts

Friday, 10 February 2012

Lesson 02 — Explorer, Keyframes & Dope Sheet

Great lesson, learned a whole bunch (despite blog-related embarrassment...!) — the dope sheet I found particularly useful. I'd not previously been aware of it at all and it certainly answered many of the frustrations I'd encountered in my previous attempts at keyframing.

Initially, we were introduced to the basic animation interface and default timeline. We were shown how to set up the camera/output preferences - I'd been having great frustration with previous exports where all my stuff came out skewed no matter what I did so it was a relief to find out what I'd been doing wrong!

File -> Preferences -> Output Format

There are a number of preset output formats - however, these will be optimized for TV display, i.e. NOT square pixels. Best to use a custom preset! 

Ensure 'Maintain Picture Ratio' is UNCHECKED.
Pixel ratio: 1
Resolution: 1024 x 576 (widescreen)

Remember to double-check frame settings - should be working at 25fps. 

Hit 'Apply settings' to... well, apply the settings!

After setting up, we started by animating a simple object using basic keyframes on the default timeline. No fancy timing adjustments or dope sheet witchcraft here.


I, rather uncreatively, picked a sphere. And made it fly uncreatively across the screen. Hey, this was a technical exercise! Achieved simply by keyframing the scale and position values of a primitive sphere object.

We were then introduced to the dope sheet which allows for much more refined animation by providing greater control over keyframes. The dope sheet can be accessed by View -> General -> Dope Sheet, or alternatively by opening the Animation Editor (shortcut 0) and then clicking Editor -> Dope Sheet.


The dope sheet is, effectively, an expanded version of Softimage's default timeline. It displays all keyframes for all parameters of the selected object all at once - far more intuitive than the regular timeline, which simply displays all keyframes on one row which can cause a lot of really unnecessary confusion.


You can select and move all keyframes for all parameters by clicking the giant green square in the topmost row - very useful for making quick timing adjustments! Alternatively, you can select one or more keyframes for specific parameters simply by clicking the corresponding coloured square for each parameter. (Hold CTRL + click to select multiple keyframes)

We were provided with a premade scene file with a croquet mallet and ball. Using the dope sheet, we basically had to use the mallet to knock the ball from A to B, using the dope sheet to adjust timings where appropriate. 


Only really had 15 minutes to do this, so it's pretty unpolished at this stage and the timing's really squiffy. I tried to delay the hammer slightly before it comes swinging down to give it a little more character, though it still needs work. I'm thinking I may hold it at the furthest position for a little bit to add some anticipation. The ball is very static too - there's no feeling of contact or weight when the mallet strikes the ball and it moves very uniformly. I'm going to try and alter the timing so the ball decelerates before coming to a stop. I'm not entirely sure how to improve the impression of power when the mallet connects with the ball; I'm going to simply need to experiment with it a little bit. Maybe if the hammer swings a little faster it would help?

I've also gone over Jon's awesome exporting tutorial which, again, solves a lot of problems I'd previously encountered with exporting, so expect a post on that soon! 

Wednesday, 8 February 2012

Softimage XSI: Keyframes and the animation editor

Sounds like a great title for a film -Keyframe and the Animation Editor! Easily the next Harry Potter...

Anyhow, figured I'd do a little post on keyframes just to act as reference. I also find that this sort of recap is really helpful to me - having to go back and re-explain everything I've covered in words really gives you a good perspective as to whether or not you've truly understood something. If you can explain why and how you did something, it's gives you a more flexible knowledge of applying it. Or... something...

These things make sense in my head.


At the bottom of the screen is the timeline. It's fairly straightforward, works much the same way as any other timeline; it displays frames! Click a frame and it takes you to that point in the animation. Keyframes are represented by those little red boxes.


At the bottom of the window is a gigantic icon of a key - here I have auto keying turned on (which basically sets keyframes automatically whenever the value of an object is changed) so my big key is greyed out. However, turning that off for a moment, the key will appear green which means you can set a keyframe at that point in time.


(Auto keying appears to still be turned on at this point - ignore it, it lies! I turned it off!!)

Click the key to set the first keyframe at the beginning point of your animation. The key will turn red and a keyframe will appear in the timeline.

We can then select a new point in the timeline (frame 20, say) and change the value of our object to set the new keyframe at that point.


Now if we select the scale tool (for example - it works with any of the transform tools) and change the value (in this case, squashing our ball flat) the key will turn yellow. This means that a value has changed, but a keyframe has not yet been set!


Click the key and it will turn red, indicating that there is a keyframe at this point. The new keyframe will appear on the timeline, and an animation will be created.


It works much like After Effects or Final Cut or anything of that nature really, just with a slightly less fancy interface! You can also set keyframes with a keyboard shortcut - K.


Editing keyframes isn't readily explained and so confused me for a while but it's actually pretty simple once you know where to go! To shift the position of keyframes on the timeline, hold shift and drag across them - they will gain a white border to indicate that they're selected. To move them, position the cursor over the keyframes (a hand icon will appear), hold the middle mouse button (hand will "grab" the frames) and drag to move them along the timeline!


You can also right click selected keyframes and right click to cut, copy or paste keyframes. You can also delete 'em from here!

This is probably the most useful way of getting your initial, basic animation down, but it's very limited and doesn't give you terribly fantastic results by itself. The real tweaking and refining seems to come in the form of the Animation Editor that I talked about previously:


This big, scary chart shows you the curves of your keyframes, plotting its motion/position through time and space. It's terrifying and I didn't understand it at first (still not entirely confident with it) but I've spent a bit of time looking into it and it's beginning to make more sense now.


It basically plots the keyframes of any given parameter of an object on a chart. By default it displays EVERYTHING, which for a complex animated scene means lots of wiggly lines everywhere, but you can filter the display and select what you want to see with the menu on the right. Here I've selected the "pos y" movement - i.e. the up-and-down movement of a bouncing ball. The little green dots are keyframes!

The bottom row of numbers on the chart are frames. The numbers on the left basically represents the value of the parameter - so, effectively, dragging the keyframes left and right on the chart adjusts the timing whereas dragging them up and down alters the spacing or shape or whatever (in this case, for example, dragging a keyframe upwards would move my ball higher into the air on that particular frame).


But that's not all! You can also really fine-tune the slope of each curve to adjust the timing and spacing accordingly. Using the keyframe/animation editor select tool (keyboard shortcut Y), click on the keyframe (or keyframes) and these little bezier handles appear.


You can drag these around and alter the slope of the curve, tweaking your animation accordingly. You also get a nice onion skin-type thing that shows you the old curve for comparison.

You need to be careful with the editor however as it can actually place frames between frames (called "ticks") is probably useful in something complex like a walk cycle or other complex movement. However, in this instance, it would be more of a hindrance. To turn it off, click on Edit in the Animation Editor and make sure "Auto snap to frames" is checked! I wasn't aware of it at the time so I ended up with a lot of these "ticks" all over my timeline... quite confusing and made editing the timing/spacing very difficult.

I knocked up a quick ball bounce using this editor to try and get a feel for how it worked. It wasn't entirely successful, but it's getting there.


The timing's a bit off - I think there needs to be more of a clear acceleration as the ball drops and I possibly need to hold the squash for just one frame longer? The second and third bounces are too jittery - there needs to be a clear distinction in height and speed to give the impression that the ball is losing energy as it comes to a stop. They're very similar right now - it kind of judders then suddenly stops. To be honest most of the problems were due to my lack of knowledge of the interface (weird as that sounds). I couldn't figure out how to achieve those things because, at the time, I didn't understand how the animation editor worked or how I was supposed to alter the timing properly. I now have a bit more understanding, though, so hopefully I'll be able to improve things on the next attempt!

Saturday, 4 February 2012

Lesson 01 — Introduction/Softimage overview

Really looking forward to the next Digital Skills unit — the amount of work is vaguely terrifying (how are all those files going to fit onto one data disc?!) but it's looking to be a good one. I've never thought that 3D was really my thing but I wonder how much of that has had to do with lack of proper tuition — now that we're actually covering it properly I can see myself quite easily growing to love it.

Today's lesson provided a pretty basic overview of the software and some of the ___ navigation and transformation tools. I'm really glad I played with the program beforehand; I don't think I would have remembered everything otherwise! Softimage is such an expansive piece of software — seeing the interface for the very first time sent me screaming into a corner…

I've previously covered the interface during my own exploration of the program so I won't repeat myself here, but just to recap in summary:
  • Main Softimage display is split into four 'viewports' which can be customized, expanded or switched with different views to best suit your workflow. By default, these are set to User/camera, a top, front and right view. 
  • You can dock any menu or panel within the four viewports for easy access.
  • 'User' viewport setting can be used to move around the environment without moving the physical camera. Very useful for checking/adjusting its position or making adjustments without botching it up!
  • Use the 'Headlight' option (found under the small menu in the top right of any viewport window) to illuminate your model from all angles.
  • The Explorer panel shows all detail about everything within your scene — similar to the layers panel in Photoshop. There are a few different explorers available: the Scene Explorer displays a list of all cameras, lights, geometry, objects etc. You can view a hierarchy of any materials or textures applied to a specific object.
  • The Selection Explorer is identical to the Scene Explorer except that it only displays information for the currently selected object.
  • Shortcuts for main transform tools are X for scale, C for rotate, V for translate. Press or hold space bar to flip to object selection mode. S is for navigation tools, allowing you to pan in and out of (middle mouse button/scroll wheel), orbit around (right mouse button) or track across (left mouse button) the scene.
  • Small panel at bottom of Softimage window will remind you of the mouse functions/shortcuts for currently selected tool.
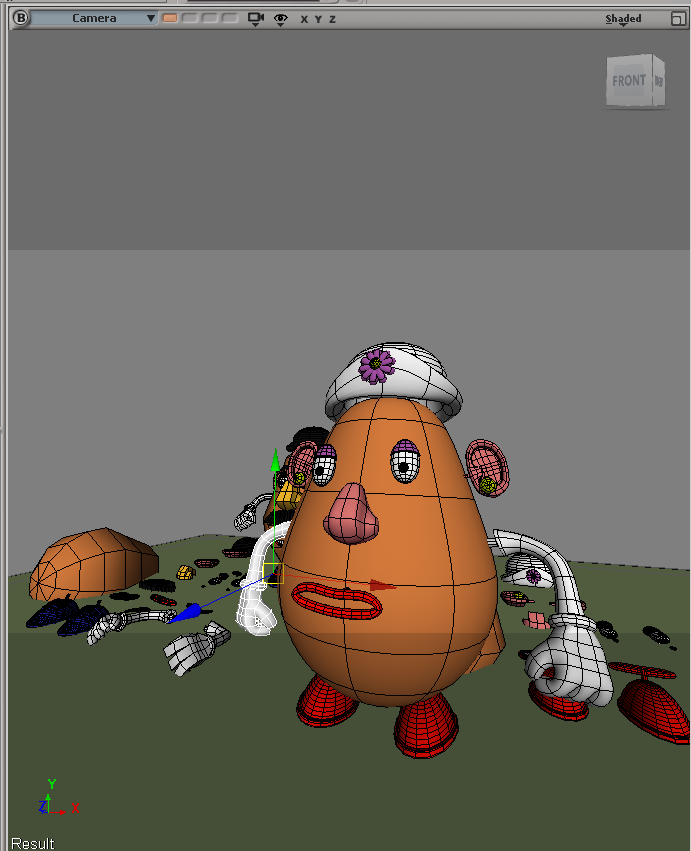
We were set a basic task to assemble Mr. and Mrs. Potatohead using the tools we'd been shown and produce a simple 4-panel comic strip using the posed figures.

(I'd just like to point out that for the majority of these screenshots I seem to be in Render mode — I'd been playing about with materials earlier today and forgot to switch it back! I didn't even notice, though, and was able to continue working without any difficulty/referring back to the menus, so I guess that's something of a sign that I'm getting better with the program...?)


My initial attempts to construct Mr Potatohead were clunky and awkward — I kept clicking the wrong buttons and forgetting which axis was which, but as I spent more time moving around the workspace I found myself adapting very quickly to the keyboard shortcuts and interface. By the time it came to Mrs. P I can say, with some measured confidence, that I was working fairly fluently within the program. I didn't struggle so much to 'read' the viewports and lining objects up became much easier.

I found that expanding the 'user' viewport on the right hand side to be most useful, leaving the other two for front and top views. This gave me the freedom of navigating within a fully 3D workspace, allowing me to freely pan and orbit around the scene and place objects pretty much however I liked. I was then able to use the other viewports to ensure everything was lined up correctly. The 2D top/front viewports are ideal for precise position, scale or rotation tweaking.


The only trouble with screenshots is that I only tend to remember to take them after I've finished doing something, which makes it look as if I work quite statically. The screenshots above would imply that I was working without moving the camera very much at all — rest assured that the big viewport was being swung around wildly, inspecting every orifice of my big plastic potato from all conceivable angles to ensure everything was plugged together properly! (I've seen enough side-views of his nose to last me a lifetime)
The caps of the eyeballs/eyelids were surprisingly tricky — once the eyeballs had been rotated into position the eyelids had to be very precisely fitted into position. If they were off in any way, the eyeball would protrude through and look a bit strange.
I made full use of all three viewports in this situation — the top and front were used to drop the eyelid into position and roughly line up the rotation, with the main 'camera' port used to fine-tune and ensure the eyelids were slotted over the eyeball correctly with no awkward protrusions. I found that choosing to display the wireframe over the shaded model (activated from the same menu as the headlight option) was amazingly useful at this point. I was able to see, at a glance, whether the meshes were aligned correctly and that the angles of the eyelids and the eyeball were matching up.

After completing the basic construction of the figures, I then had to remap my laptop keyboard to allow me to increase the mesh's subdivisions — that's tech-talk for "make it pretty!"

Once the model has been smoothed out you can really see the difference. The size and position of the pieces will have changed slightly, so I spent a little bit of time tweaking the position of the limbs to make sure everything was in place again.
(this is terrifying and I apologise)

With my models put together and smoothed out, it's now time to pose them and start on that comic!

Friday, 3 February 2012

Softimage XSI: Keyframe animation tests

I've sort of got the hang of the very basics of Softimage at this point (still getting used to shortcuts and whatnot) so I've started experimenting a bit with the actual animation capabilities. Nothing complex so far; I've had a go with keyframe animation in an attempt to figure out how it works. 

I did have screenshots of all the following exercises, but unfortunately some unforeseen technical problems forced me to re-install the Windows partition. I was a bit stupid and backed up my actual project files but forgot the screenshots... hey ho, lesson learned. I'll do my best to gabble my way through this and then re-take some shots later today!


The first attempt was the most straightforward piece of keyframing I could muster; sliding a ball across the floor. Mostly just trying to figure out how things actually work here before I start getting too fancy! 

Once I'd learned where all the buttons were, I tried messing around with timing and spacing a little bit.


I attempted to inject some sort of character into the ball — I was aiming to have it speed in and then slow to a stop, but Softimage has a slightly convoluted way of working with keyframes and I'm not quite used to it. I couldn't figure out how to move keyframes on the timeline, or delete them properly, so I was pretty much stuck with what I botched out first time. It's alright — it works, but the timing and speed is very off. There doesn't seem to be any onion skinning or anything so it's quite difficult to map out the spacing correctly — this was mostly guesswork!

After the second attempt I did a little more reading into how keyframes work to try and get a better understanding before I tried anything again. I managed to figure out how to edit and delete them at long last, so the third attempt was marginally more successful:


I'm not entirely sure why the ball is moving away from the camera, as I was positive that I'd animated it in a straight line as with the others — perhaps I messed something up with the camera settings or export. It could also be that I used the animation editor to tweak this one rather than standard keyframing — it's hard to describe without screenshots, but it's basically a big curve graph that displays keyframes on the parameters of an object (the position or scale, say) that allows you to very quickly see where the "rough" spots are and smooth it out — quite literally. Dragging the keyframes up or down on the graph alters the curve and adjusts the parameters so you can pretty quickly get a feel for the timing and how it's going to run before you even hit the play button.

I can see it being a really intuitive and useful way of animating but it takes some getting used to! As we see here the ball is perhaps too quick and there's not quite enough of a slow down at the end, but it's a start!

Sunday, 29 January 2012

Softimage XSI: Selecting and transforming objects

Now that I've got a basic overview of the interface, I'm getting my hands dirty with actually moving and manipulating objects. Wish me luck...


Here I've got two "primitive" objects, a sphere and a cylinder. Currently the cylinder is selected. The panel on the right hand side is my transformation panel and contains all the tools I need to scale, rotate or translate (move) my object around the workspace. Currently, scale is selected.


Objects can be scaled by simply grabbing the handle and dragging it up or down to transform the object along that axis.

Objects can be transformed across all three axis simultaneously by clicking and dragging in the center of all the axis. This constrains the proportions of the object across all axis - similar to scaling whilst holding shift in Photoshop.


You can also transform objects on just two of the axis by holding the cursor between the two handles that you want, then clicking and dragging in the normal way. I got far more excited about this than I perhaps should.

The space bar functions as the select tool in Softimage. Hold shift to select a new object - otherwise you'll continue to transform the previously selected object!

Keyboard shortcuts

Scale - X
Rotate - C
Translate -V
Select - Space bar

Getting started with Softimage XSI

Decided to get a bit of a head start with some new software in preparation for the next Digital Skills project, so I've managed to cram Softimage XSI onto my computer and have proceeded to try and get to know the program over a romantic candlelit dinner.

Or, rather, the excellent beginner tutorials over at http://www.digitaltutors.com

I've not gotten much further than learning how to navigate through the 3D workspace just yet, but that's a start! I'm going to make a note of all the shortcuts and things as I learn them, as a bit of a reference.

Camera controls

While holding S

Left mouse button: pan/track around
Scroll wheel/middle mouse button:  zoom/"dolly" in and out
Right mouse button: rotate/orbit camera

Keyboard shortcuts
 
F: centers ("frame") selected object
A: centers everything in the scene